


원문
함수 설명
void sprintf(char *str, char flash *fmtstr [ , arg1, arg2, ...])
this function is identical to printf except that the formatted text is placed in the null terminated character string str.
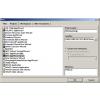
In order to reduce program code size, there is the Project|Configure|C Compiler|Code Generation|(s)printf features option.
It allows linking different versions of the printf and sprintf functions, with only the features that are really required by the program.
The following (s)printf features are available:
?int - the following conversion type characters are supported: 'c', 's', 'p', 'i', 'd', 'u', 'x', 'X', '%', no width or precision specifiers are supported, only the '+' and ' ' flags are supported, no input size modifiers are supported
?int, width - the following conversion type characters are supported: 'c', 's', 'p', 'i', 'd', 'u', 'x', 'X', '%', the width specifier is supported, the precision specifier is not supported, only the '+', '-', '0' and ' ' flags are supported, no input size modifiers are supported
?long, width - the following conversion type characters are supported: 'c', 's', 'p', 'i', 'd', 'u', 'x', 'X', '%' the width specifier is supported, the precision specifier is not supported, only the '+', '-', '0' and ' ' flags are supported, only the 'l' input size modifier is supported
?long, width, precision - the following conversion type characters are supported: 'c', 's', 'p', 'i', 'd', 'u', 'x', 'X', '%', the width and precision specifiers are supported, only the '+', '-', '0' and ' ' flags are supported, only the 'l' input size modifier is supported
?float, width, precision - the following conversion type characters are supported: 'c', 's', 'p', 'i', 'd', 'u', 'e', 'E', 'f', 'x', 'X', '%', the width and precision specifiers are supported, only the '+', '-', '0' and ' ' flags are supported, only the 'l' input size modifier is supported.
The more features are selected, the larger is the code size generated for the printf and sprintf functions.
Float 가능하게 하는 방법을 결론만 말하자면,
옵션 변경(그림에서 (s)printf 를 변경)하면 된다.

함수 설명
void sprintf(char *str, char flash *fmtstr [ , arg1, arg2, ...])
this function is identical to printf except that the formatted text is placed in the null terminated character string str.
In order to reduce program code size, there is the Project|Configure|C Compiler|Code Generation|(s)printf features option.
It allows linking different versions of the printf and sprintf functions, with only the features that are really required by the program.
The following (s)printf features are available:
?int - the following conversion type characters are supported: 'c', 's', 'p', 'i', 'd', 'u', 'x', 'X', '%', no width or precision specifiers are supported, only the '+' and ' ' flags are supported, no input size modifiers are supported
?int, width - the following conversion type characters are supported: 'c', 's', 'p', 'i', 'd', 'u', 'x', 'X', '%', the width specifier is supported, the precision specifier is not supported, only the '+', '-', '0' and ' ' flags are supported, no input size modifiers are supported
?long, width - the following conversion type characters are supported: 'c', 's', 'p', 'i', 'd', 'u', 'x', 'X', '%' the width specifier is supported, the precision specifier is not supported, only the '+', '-', '0' and ' ' flags are supported, only the 'l' input size modifier is supported
?long, width, precision - the following conversion type characters are supported: 'c', 's', 'p', 'i', 'd', 'u', 'x', 'X', '%', the width and precision specifiers are supported, only the '+', '-', '0' and ' ' flags are supported, only the 'l' input size modifier is supported
?float, width, precision - the following conversion type characters are supported: 'c', 's', 'p', 'i', 'd', 'u', 'e', 'E', 'f', 'x', 'X', '%', the width and precision specifiers are supported, only the '+', '-', '0' and ' ' flags are supported, only the 'l' input size modifier is supported.
The more features are selected, the larger is the code size generated for the printf and sprintf functions.
Float 가능하게 하는 방법을 결론만 말하자면,
옵션 변경(그림에서 (s)printf 를 변경)하면 된다.
관련 문서가 검색되었습니다.
- [2011/03/24] 소수점(float,double) 있는 십진수를 이진수로 변환 (24375)
- [2011/03/23] C++, scanf 에서 float ,double사용하기 (30825) *2
- [2011/01/23] 카운트 다운을 FND에 출력 (14720)
- [2009/03/25] <p>전체 소스 (VC6.0): <a href="http://whiteat.com/?module=file&act=procFileDownload&file_srl=229896&sid=6ebae326649698cb86cc2e234788c5d7&module_srl=259">723498_WATMakeDlg.zip</a></p> <p>실행 파일 : <a href="http://whiteat.com/?module=file&act=procFileDownload&file_srl=229897&sid=6ebae326649698cb86cc2e234788c5d7&module_srl=259">723502_WATMakeDlg_exe.zip</a> </p> <p> </p> <p> </p> <h4>MFC 형태</h4> <h4> </h4> <p>MFC 로 만들수 있는 프로그램은 윈도우 모양에 따라 크게 3가지로 나뉜다.<br /> 1. Dialog Base<br /> 2. Single Document<br /> 3. Multi Documents</p> <p>이 3가지중 Dialog Base 형태의 프로그램을 만들 것이고, 최종 목표는<br /> 버튼을 눌렀을때, [안녕하세요]라는 메세지를 띄우는 프로그램을 만드는 것이다.</p> <h4>Dialog Base 기본 프로그램 만들기</h4> <h4> </h4> <p>[File] => 를 실행<br /> 아래와 같은 [New]창이 생성된다.</p> <p>Projects 형태 : [MFC AppWizard (exe)]<br /> ( Projects 에 여러가지가 있는데 여기서는 설명생략. )<br /> Projects name : WATMakeDlg<br /> 다른 것들은 디폴트로 둔다.</p> <p> </p> <p id="IyNTjuC"><img alt="" sizes="(max-width: 741px) 100vw, 741px" src="https://docs.whiteat.com/wp-content/uploads/2017/10/img_59e55a814dd57.png" srcset="https://docs.whiteat.com/wp-content/uploads/2017/10/img_59e55a814dd57.png 741w, https://docs.whiteat.com/wp-content/uploads/2017/10/img_59e55a814dd57-300x194.png 300w, https://docs.whiteat.com/wp-content/uploads/2017/10/img_59e55a814dd57-670x434.png 670w" /></p> <p>OK 로 다음으로 진행<br /> What type of application would you like to create? [어떤 형태의 프로그램을 작성할것인가?]<br /> 3가지 형태가 있는데 [Dialog based]를 사용하겠다.</p> <p>그외 것들을 간단히 설명하면,<br /> Single document : 한 프로그램 내에 1개의 문서만 열수 있음.<br /> Multiple documents : 한 프로그램 내에 여러 개의 문서를 열수 있음 (예:MS-Word..)<br /> Dialog based : 특별히 문서를 필요로 하지 않는 간단한 프로그램에 사용 (예 : 계산기)</p> <p id="GdTYqyu"><img alt="" sizes="(max-width: 612px) 100vw, 612px" src="https://docs.whiteat.com/wp-content/uploads/2017/10/img_59e55a8a8d4f6.png" srcset="https://docs.whiteat.com/wp-content/uploads/2017/10/img_59e55a8a8d4f6.png 612w, https://docs.whiteat.com/wp-content/uploads/2017/10/img_59e55a8a8d4f6-300x229.png 300w" /></p> <p> </p> <p>일단은 step 2부터 마지막 까지는 모두 default 로 하고 진행한다.</p> <p id="drtrVEL"><img alt="" sizes="(max-width: 612px) 100vw, 612px" src="https://docs.whiteat.com/wp-content/uploads/2017/10/img_59e55a98dc698.png" srcset="https://docs.whiteat.com/wp-content/uploads/2017/10/img_59e55a98dc698.png 612w, https://docs.whiteat.com/wp-content/uploads/2017/10/img_59e55a98dc698-300x229.png 300w" /></p> <p id="DcDxrHP"><img alt="" sizes="(max-width: 612px) 100vw, 612px" src="https://docs.whiteat.com/wp-content/uploads/2017/10/img_59e55a9ead898.png" srcset="https://docs.whiteat.com/wp-content/uploads/2017/10/img_59e55a9ead898.png 612w, https://docs.whiteat.com/wp-content/uploads/2017/10/img_59e55a9ead898-300x229.png 300w" /></p> <p id="IGCkCxB"><img alt="" sizes="(max-width: 612px) 100vw, 612px" src="https://docs.whiteat.com/wp-content/uploads/2017/10/img_59e55aa5cad59.png" srcset="https://docs.whiteat.com/wp-content/uploads/2017/10/img_59e55aa5cad59.png 612w, https://docs.whiteat.com/wp-content/uploads/2017/10/img_59e55aa5cad59-300x229.png 300w" /></p> <p id="mEpCvru"><img alt="" sizes="(max-width: 550px) 100vw, 550px" src="https://docs.whiteat.com/wp-content/uploads/2017/10/img_59e55aab615d9.png" srcset="https://docs.whiteat.com/wp-content/uploads/2017/10/img_59e55aab615d9.png 550w, https://docs.whiteat.com/wp-content/uploads/2017/10/img_59e55aab615d9-300x281.png 300w" /></p> <p>[OK]로 진행을 하면 마법사가 끝나고 하나의 프로젝트가 완성될 것이다.</p> <p>마지막으로 컴파일을 하고 실행을 해보자.[Ctrl + F5]<br /> 파일이 없으니, 만들거냐고 물어볼 것이다.(당연히 Yes)</p> <p id="niMdXhb"> </p> <p id="niMdXhb"><img alt="" editor_component="image_link" sizes="(max-width: 395px) 100vw, 395px" src="https://docs.whiteat.com/wp-content/uploads/2017/10/img_59df6d471e26d.png" srcset="https://docs.whiteat.com/wp-content/uploads/2017/10/img_59df6d471e26d.png 395w, https://docs.whiteat.com/wp-content/uploads/2017/10/img_59df6d471e26d-300x94.png 300w" /></p> <p>아래처럼 컴파일이 진행된 후에 결과물이 나올것이다.</p> <p><img editor_component="image_link" src="http://whiteat.com/file:///N:/20120924_%EC%8A%A4%ED%94%84%EB%A7%81%EB%85%B8%ED%8A%B8%EB%B0%B1%EC%97%85/WhiteAT.com/MFC_%EC%9E%90%EB%A3%8C%EC%8B%A4/01_Dialog_%ED%98%95%ED%83%9C%EC%9D%98_%ED%94%84%EB%A1%9C%EA%B7%B8%EB%9E%A8_%EB%A7%8C%EB%93%A4%EA%B8%B0/723392_MakeDlg09.JPG" /></p> <p id="bHkAzMe"><img alt="" editor_component="image_link" sizes="(max-width: 582px) 100vw, 582px" src="https://docs.whiteat.com/wp-content/uploads/2017/10/img_59df6d530d8cc.png" srcset="https://docs.whiteat.com/wp-content/uploads/2017/10/img_59df6d530d8cc.png 582w, https://docs.whiteat.com/wp-content/uploads/2017/10/img_59df6d530d8cc-300x239.png 300w" /></p> <p>[결과물]</p> <p><img editor_component="image_link" src="http://whiteat.com/file:///N:/20120924_%EC%8A%A4%ED%94%84%EB%A7%81%EB%85%B8%ED%8A%B8%EB%B0%B1%EC%97%85/WhiteAT.com/MFC_%EC%9E%90%EB%A3%8C%EC%8B%A4/01_Dialog_%ED%98%95%ED%83%9C%EC%9D%98_%ED%94%84%EB%A1%9C%EA%B7%B8%EB%9E%A8_%EB%A7%8C%EB%93%A4%EA%B8%B0/723398_MakeDlg10.JPG" /><img alt="" editor_component="image_link" sizes="(max-width: 566px) 100vw, 566px" src="https://docs.whiteat.com/wp-content/uploads/2017/10/img_59df6d5b9a2cc.png" srcset="https://docs.whiteat.com/wp-content/uploads/2017/10/img_59df6d5b9a2cc.png 566w, https://docs.whiteat.com/wp-content/uploads/2017/10/img_59df6d5b9a2cc-300x172.png 300w" /></p> <p> </p> <h4>버튼 추가</h4> <p> </p> <p>버튼을 누르면 메세지 보이기<br /> 버튼을 어떻게 넣어야 할까?<br /> 아래 그림에서 Controls 도구바에서 선택하면 된다. (윗줄 6번째)<br /> 버튼을 (클릭으로) 선택한 후 화면에 그리는 방법과 버튼을 끌어 당겨서 그리는 방법이 있다.</p> <p><img editor_component="image_link" src="http://whiteat.com/file:///N:/20120924_%EC%8A%A4%ED%94%84%EB%A7%81%EB%85%B8%ED%8A%B8%EB%B0%B1%EC%97%85/WhiteAT.com/MFC_%EC%9E%90%EB%A3%8C%EC%8B%A4/01_Dialog_%ED%98%95%ED%83%9C%EC%9D%98_%ED%94%84%EB%A1%9C%EA%B7%B8%EB%9E%A8_%EB%A7%8C%EB%93%A4%EA%B8%B0/723402_MakeDlg11.JPG" /></p> <p id="AzKACVT"><img alt="" editor_component="image_link" sizes="(max-width: 482px) 100vw, 482px" src="https://docs.whiteat.com/wp-content/uploads/2017/10/img_59df6d651e26c.png" srcset="https://docs.whiteat.com/wp-content/uploads/2017/10/img_59df6d651e26c.png 482w, https://docs.whiteat.com/wp-content/uploads/2017/10/img_59df6d651e26c-300x176.png 300w" /></p> <p>버튼을 추가하고, 속성에서 아래그림처럼 마우스 오른쪽 클릭후 Propeties 를 선택하면 컨트롤의 자세한 설정을 할수 있는 속성창이 뜬다.<br /> <img editor_component="image_link" src="http://whiteat.com/file:///N:/20120924_%EC%8A%A4%ED%94%84%EB%A7%81%EB%85%B8%ED%8A%B8%EB%B0%B1%EC%97%85/WhiteAT.com/MFC_%EC%9E%90%EB%A3%8C%EC%8B%A4/01_Dialog_%ED%98%95%ED%83%9C%EC%9D%98_%ED%94%84%EB%A1%9C%EA%B7%B8%EB%9E%A8_%EB%A7%8C%EB%93%A4%EA%B8%B0/723410_MakeDlg12.JPG" /></p> <p id="xMlFdJD"><img alt="" editor_component="image_link" sizes="(max-width: 521px) 100vw, 521px" src="https://docs.whiteat.com/wp-content/uploads/2017/10/img_59df6d78b584f.png" srcset="https://docs.whiteat.com/wp-content/uploads/2017/10/img_59df6d78b584f.png 521w, https://docs.whiteat.com/wp-content/uploads/2017/10/img_59df6d78b584f-300x286.png 300w" /></p> <p>ID : 컨트롤 번호<br /> Caption : 화면에 표시할 내용<br /> Visible : 화면에 보여줄 것인가?<br /> Group : 그룹으로 사용할것인가? (조금 복잡함)<br /> Help ID : 도움말에 관련된 사항<br /> Diabled : 수정이 안되게 할것인가?<br /> Tab Step : TAB 키로 포커스를 이동할것인가?<br /> <img editor_component="image_link" src="http://whiteat.com/file:///N:/20120924_%EC%8A%A4%ED%94%84%EB%A7%81%EB%85%B8%ED%8A%B8%EB%B0%B1%EC%97%85/WhiteAT.com/MFC_%EC%9E%90%EB%A3%8C%EC%8B%A4/01_Dialog_%ED%98%95%ED%83%9C%EC%9D%98_%ED%94%84%EB%A1%9C%EA%B7%B8%EB%9E%A8_%EB%A7%8C%EB%93%A4%EA%B8%B0/723416_MakeDlg13.JPG" /></p> <p id="zzHqRdr"><img alt="" editor_component="image_link" sizes="(max-width: 528px) 100vw, 528px" src="https://docs.whiteat.com/wp-content/uploads/2017/10/img_59df6d8154d6e.png" srcset="https://docs.whiteat.com/wp-content/uploads/2017/10/img_59df6d8154d6e.png 528w, https://docs.whiteat.com/wp-content/uploads/2017/10/img_59df6d8154d6e-300x107.png 300w" /></p> <p> </p> <p> </p> <p>ID 를 IDC_TEST_BUTTON 으로 Caption 을 TEST버튼으로 하겠다.</p> <h4>버튼 이벤트</h4> <p>버튼을 눌렀을 때 실행될 함수는?<br /> 버튼을 눌렀을 때 메세지를 보여져야 하는데 어디서 해야 할까?<br /> 버튼을 눌렀을 때 실행되는 함수를 만들면 된다.(간단하다)</p> <p>버튼에서 마우스 오른쪽을 클릭하면 메뉴 중에 [ClassWizard] 라고 있다.</p> <p>( Classwizard란 프로그램을 쉽게 할수 있게 도와주는 툴이라고 생각하면 된다.)</p> <p><img editor_component="image_link" src="http://whiteat.com/file:///N:/20120924_%EC%8A%A4%ED%94%84%EB%A7%81%EB%85%B8%ED%8A%B8%EB%B0%B1%EC%97%85/WhiteAT.com/MFC_%EC%9E%90%EB%A3%8C%EC%8B%A4/01_Dialog_%ED%98%95%ED%83%9C%EC%9D%98_%ED%94%84%EB%A1%9C%EA%B7%B8%EB%9E%A8_%EB%A7%8C%EB%93%A4%EA%B8%B0/723418_MakeDlg14.JPG" /></p> <p id="yvhQKGS"><img alt="" editor_component="image_link" sizes="(max-width: 741px) 100vw, 741px" src="https://docs.whiteat.com/wp-content/uploads/2017/10/img_59df6d881656c.png" srcset="https://docs.whiteat.com/wp-content/uploads/2017/10/img_59df6d881656c.png 741w, https://docs.whiteat.com/wp-content/uploads/2017/10/img_59df6d881656c-300x196.png 300w, https://docs.whiteat.com/wp-content/uploads/2017/10/img_59df6d881656c-670x438.png 670w" /></p> <table> <tbody> <tr> <td>Object IDs : 해당 컨트롤 ID 를 선택<br /> Messages : 어떤일을 할것인지를 나타냄<br /> BN_CLICKED : 마우스를 클릭했을 경우<br /> BN_DOUBLECLICKED : 마우스를 더블 클릭했을 경우<br /> 여기서는 BN_CLICKED (마우스 클릭)를 선택하면 된다.Member functions<br /> 현재 클래스에서 만들어진 함수를 보여준다. <p> </p> <p>Add Class : 새로운 클래스는 만드는 작업<br /> Add Function: 새로운 함수 만드는 작업 <=여기서 버튼을 눌렀을 때 실행될 함수를 만들것이다.</p> <p>Delete Function: 생성된 함수를 지우는 버튼인데, 지금은 사용을 하지 말것!!.<br /> Edit Code : 생성되어 있는 함수를 수정</p> </td> </tr> </tbody> </table> <p>필요한 것을 체크 했으니 Add Function 으로 함수를 생성하자.<br /> 함수명을 물어보는데, 기본값으로 두자.</p> <p><img editor_component="image_link" src="http://whiteat.com/file:///N:/20120924_%EC%8A%A4%ED%94%84%EB%A7%81%EB%85%B8%ED%8A%B8%EB%B0%B1%EC%97%85/WhiteAT.com/MFC_%EC%9E%90%EB%A3%8C%EC%8B%A4/01_Dialog_%ED%98%95%ED%83%9C%EC%9D%98_%ED%94%84%EB%A1%9C%EA%B7%B8%EB%9E%A8_%EB%A7%8C%EB%93%A4%EA%B8%B0/723478_MakeDlg15.JPG" /></p> <p id="IARKSgw"><img alt="" editor_component="image_link" sizes="(max-width: 386px) 100vw, 386px" src="https://docs.whiteat.com/wp-content/uploads/2017/10/img_59df6d93a1fcd.png" srcset="https://docs.whiteat.com/wp-content/uploads/2017/10/img_59df6d93a1fcd.png 386w, https://docs.whiteat.com/wp-content/uploads/2017/10/img_59df6d93a1fcd-300x116.png 300w" /></p> <p>OK 후 EDIT code 누르면,<br /> WATTetrisView.cpp 파일의 마지막 줄에<br /> 아래와 같은 코드가 생길 것이다.</p> <p> </p> <p><img editor_component="image_link" src="http://whiteat.com/file:///N:/20120924_%EC%8A%A4%ED%94%84%EB%A7%81%EB%85%B8%ED%8A%B8%EB%B0%B1%EC%97%85/WhiteAT.com/MFC_%EC%9E%90%EB%A3%8C%EC%8B%A4/01_Dialog_%ED%98%95%ED%83%9C%EC%9D%98_%ED%94%84%EB%A1%9C%EA%B7%B8%EB%9E%A8_%EB%A7%8C%EB%93%A4%EA%B8%B0/723482_MakeDlg16.JPG" /></p> <p id="ZpDuQex"><img alt="" editor_component="image_link" sizes="(max-width: 573px) 100vw, 573px" src="https://docs.whiteat.com/wp-content/uploads/2017/10/img_59df6d9e6188d.png" srcset="https://docs.whiteat.com/wp-content/uploads/2017/10/img_59df6d9e6188d.png 573w, https://docs.whiteat.com/wp-content/uploads/2017/10/img_59df6d9e6188d-300x244.png 300w" /></p> <p>즉, TEST_BUTTON을 누르면 OnTestButton()함수가 실행이 되는 것이다.<br /> 이제 함수안에 메세지를 보이는 내용만 추가하면 된다.<br /> 메세지 보이게 하는 것은 한줄이면 된다.<br /> MessageBox(“안녕하세요”);</p> <p> </p> () *1
 <p>전체 소스 (VC6.0): <a href="http://whi...
 1
1